27/03/2025 • 5m de lectura • 7m vídeo
How to Replace a Dirt Bike Rear Brake Lever

Charlie Frost Author
Installing a rear brake lever correctly is crucial for your dirt bike's safety and performance. This step-by-step guide will walk you through the proper replacement process, ensuring your brake lever functions perfectly. Make sure to watch the video for a visual walkthrough.
Required Tools to get the job done:
Long nose pliers
Socket set and ratchet spanner
Thread lock
New split pin
Clean cloth for cleaning parts


Step-by-Step Process:
Spring Removal
First, remove the return spring using long nose pliers. Carefully detach it from both the lever and engine casing points. Set this spring aside as it will be reused later.
Pump Linkage Disassembly
Remove the clip piece that connects to the master cylinder. Note that the split pin on the back typically needs replacement as they tend to snap during removal. Carefully separate this connection from the brake lever assembly.
Main Bolt Removal
Hold the nut on the back with a ratchet spanner
Remove the main allen bolt
Push the bolt through with your finger
Slide the old brake lever out
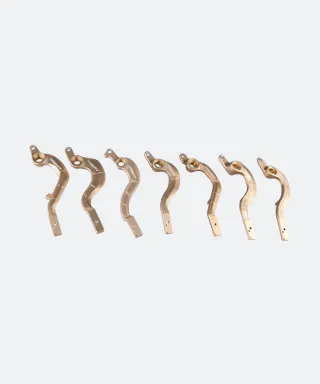
Pro Tip: When examining your old brake lever, check the bearing inside. Wear in this bearing often causes excessive play in the lever. While you can replace just the bearing, many riders opt for a complete lever assembly when damage occurs.
Installation of New Lever
Position the new lever in place
Clean the original bolt thoroughly if reusing it
Apply a thin layer of thread lock to the bolt
Insert the bolt through the lever and frame
Attach and tighten the nut securely
Reassembly
Reinstall the pump linkage clip
Insert a new split pin and fold it properly
Reattach the return spring, starting with the bottom connection
Complete the installation by securing the top spring connection
Pro Tip: The brake tip (end piece) is customizable. You can purchase extended or stronger replacement tips, particularly useful for bikes with engine covers where boot access might be limited.
FAQs
Final words
When done correctly, this entire process should take between 5-10 minutes. Proper installation ensures safe and reliable brake operation, which is crucial for your riding safety.

Author information
My name is Charlie Frost, and I'm no stranger to the adrenaline-fueled world of extreme enduros. Starting my journey at 19, I seamlessly blended trials and enduro racing, honing my skills through youth events and extreme races like the Tough One and Erzberg. When I'm not tearing through rugged terrain, you can often find me in front of the 24MX camera, sharing my passion and insights with fellow riders, as we delve into the exhilarating world of off-road racing.